Note: I'm using MathJax to code the mathematics in this webpage.
LaTeX Tables and Arrays can be tricky.
- Tables and Arrays can be made with or without outer borders,
- the entries of tables are regular text,
- the entries of arrays are regular math mode (textstyle).
There are macros in LaTeX to make it easy to produce matrices with
parentheses enclosing it, or to to enclose it with brackets. The first is
\ begin{pmatrix}
.....
\ end{pmatrix}
and the second is by
\ begin{bmatrix}
.....
\ end{bmatrix}
One uses '&' to mark column alignments. It's messy, but it works.
Now, I may have just missed out on the trick to make it easy to force
my columns to align as I want them to using this 'matrix' environment,
but I have found this easy to do in the array environment. Let's compare them.
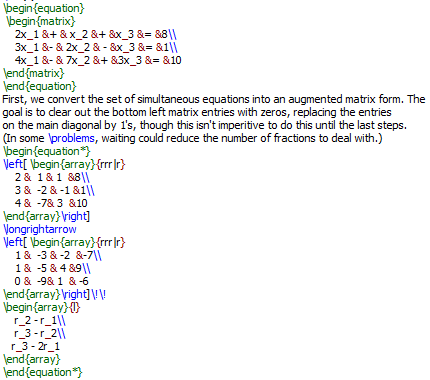
This produces the following output:

So, let's go over this. The system of three simultaneous equations were
printed as a 'matrix', and the ampersands were used to enforce the alignments
that I wanted. Everything after the prose is just one equation, placed in
the {equations*} environment. The '*' tells LaTeX not to place an equation
number for that equation. Then we have the first matrix on the bottom left, which
I placed in the array environment because it gives me subtle control over the
alignment of columns. So, we have four columns, each of which can be aligned
as either left 'l', center 'c', or right 'r' in the column. Obviously, I chose to
have them all right aligned.
Now, an array does not come with braces or brackets, but there is an easy way
to place them on either side of the array: just place a '\left[' or a '\left(' and match
them with a '\right]' or a '\right)', as the case may be. LaTeX will auto size
the bracket or parenthesis for this array. However, if for some reason you want to
use the '\left[' without the '\right]', LaTeX will call that an error. The way
around this is to place the dummy command '\.' in place of '\right]'.
To get that right alignment that I wanted, I used the alignment parameters {rrr|r}
which tells LaTeX to right-align all four columns. The vertical line '|' tells
LaTeX to place a vertical line between the third and fourth columns, and it looks good.
So, I was performing row operations on the augmented matrices. The last column tells
the reader of the paper the exact nature of those row operations, such as r2 - r1. I
again used the array enviroment to accomplish this, and this was a case that I did not
want them inside brackets or parentheses, as they are marginal comments, not
matrix elements.
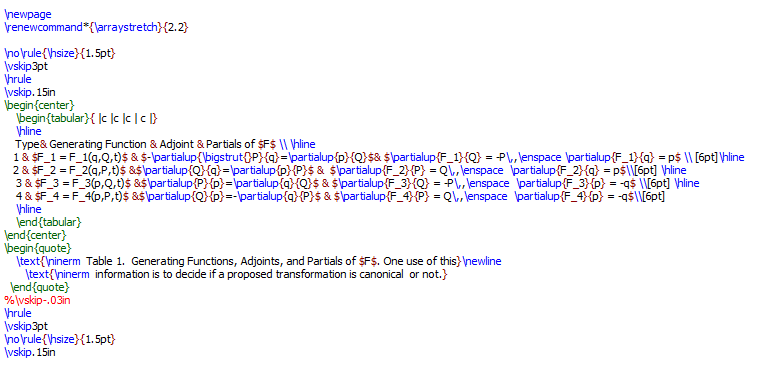
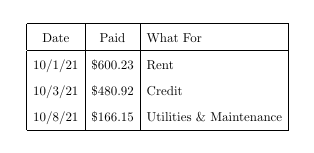
The following code produces a beautiful table for displaying mathematics.
The macro '\no' is short for \noindent.
Download the Code for this Table
Feel free to download this code to play with it, experiment on it, or edit
it to make your own table.
The graphic below is the rendering of the TeX code.
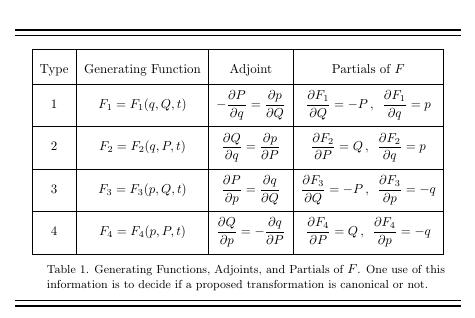
The default mode of the entries in a table are text, so I add in dollar signs to make a local math environment.
The hrules (the horizontal lines at the top and bottom of the graphic) are not part of the table,
but they add to its beauty
in my opinion. Use them yourself if you want.
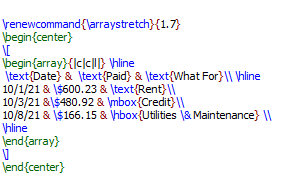
The following code creates an array to envision a made-up monthly expense account.
The code '\\$' tells the compiler to print a dollar sign.
Download the Code for this Table
Feel free to download this code to play with it, experiment on it, or edit it
to make your own array.
The graphic below is the rendering of the TeX code.
The parameter \arraystretch adjusts the height of the array, while leaving the width the same.
The array parameters r, c, l tell the compiler how to align the columns, being, respectively, right
justified, centered, or left justified. Therefore, all columns can be adjusted independently.
The default mode of the entries in an array are in math mode, so for me to get regular
text, I must place that text inside a text box. There are three of them that I
know of: \text{}, \hbox{}, and mbox{}. I used all three only for demonstration
purposes. You should ordinarily pick just one to use throughout your array.
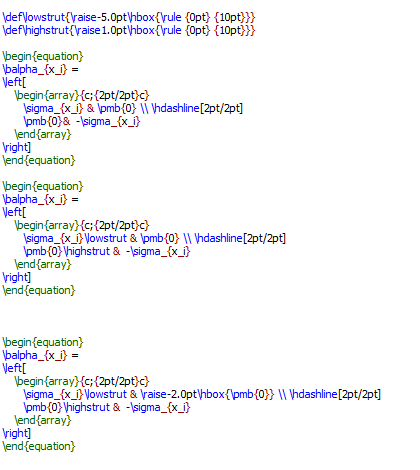
Now, say we want to place solid or dotted lines through our matrix. I know one good
way to do this, but it requires some tweaking for best results. Consider the following three
attempts to do this to a simple matrices, I'll refer to as "Graphic One":

The code I used for this demonstration is (one block of code for
each matrix equation):
To use the command parameters in the array command, place the
command '\usepackage{arydshln}' in the preamble of the TeX code.
Now, my first attempt to make the matrix at the top of Graphic One you can see for yourself
that in the first column the symbols look too close to the horizontal dashed line. The only
way I know to fix this is with me tweaking it by trial and error. The way I have found to
do this is to include an invisible vertical line in the code to force the symbol to raise or
lower, as I see fit. To that end, I use the \rule command to make a rectangle of vertical
and horizontal dimensions as I please. As is clear from the code I chose for this fix, the
width of the struts were of zero amount and the heights were 10pt, and I had to play around
with those vertical dimensions to get what I wanted. Of course, a zero-thickness strut is
invisible.
Next, I had to place them on the line and adjust their heights on the line. I use the \raise
command to do this. You raise or lower with a positive or negative value, respectively.
So, when I applied these struts in the appropriate places, I almost got the result I wanted.
There was just one problem: I got a side effect in the bold zero in the top right. So, what I
needed was a means to lower this symbol all by itself. By trial and error, I found that lowering
by 2 points was enough. To accomplish that, I placed the bold zero into an hbox and then lowered
the hbox with the command \raise-2.0pt\bhox{\pmb{0}}. Then end result was the graphic at the
bottom of Graphic One.
Now, one could claim that this is a lot of work and time to go to just get a simple matrix
to look right, and that may well be. The question is, How perfect do you want your final output
to look. You're not going to get something for nothing: not in Word, and not in LaTeX.
As an alternative to the procedure I used, I could have attempted to adjust each
entry separately.